:focal(smart))
Getting started with ROS 2 Communication
Starting to learn about ROS 2 can be overwhelming, but I think it's actually pretty simple on a conceptual level. Let me take you through the way I think about it.
ROS 2 explained to a kid
Imagine a robot that has to do a lot of things. It needs to see, hear, talk, think and move its arms and legs.
Nodes
Unlike a human that has one big brain, a robot often uses different brain parts to deal with all these different abilities. In the ROS world we would split those up into something called "Nodes", so Nodes are small brain parts for a certain ability.
Topics
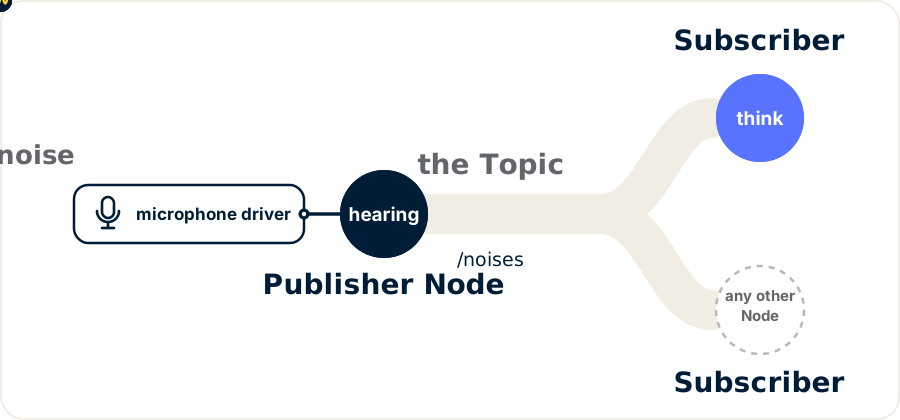
To actually make a robot do useful things, those abilities don't stand on their own. They have to have a way to send signals between the different Nodes. There are different types of signals. The hearing Node is creating a constant stream of noises the robot has to listen to, so you would send this over a "Topic". A Topic is a signal that has a sender and a receiver, a "Publisher" and a "Subscriber". For example the hearing Node will publish the noises to whatever ability subscribes to it, for example the thinking ability. As long as the ears are working properly the hearing Node will publish the noises to any part of the robot brain that's interested in them.
Actions
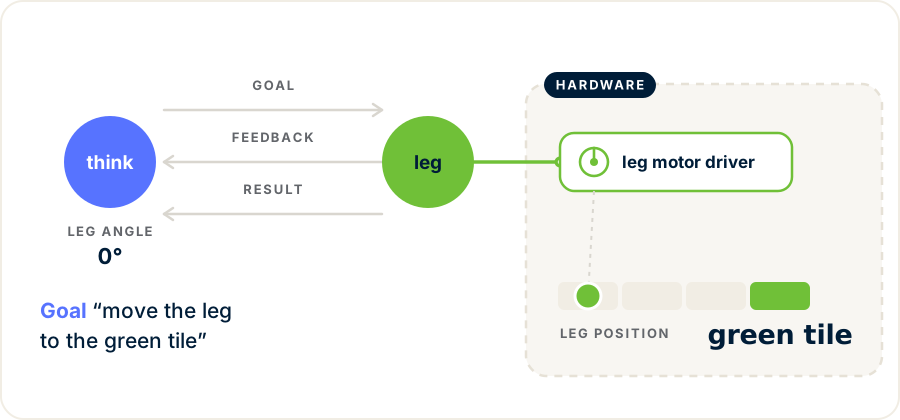
The thinking Node can then process the noises into something useful and translate that into "Actions". Actions are another type of signal a robot can use between different Nodes. An Action starts by sending a request to another Node. For example, send a "Move leg to green tile" request to the leg Node. When the leg Node receives it, it can start the movement. And while it's moving it can give Feedback about how far the leg has moved. This is again important for the thinking Node, because it wants to know where its arms and legs are, to be able to make the right decision for the next noises it hears. When the leg is moved, the leg Node can also respond with the Result that it's done, for example "I moved my left leg to the green tile".
Services
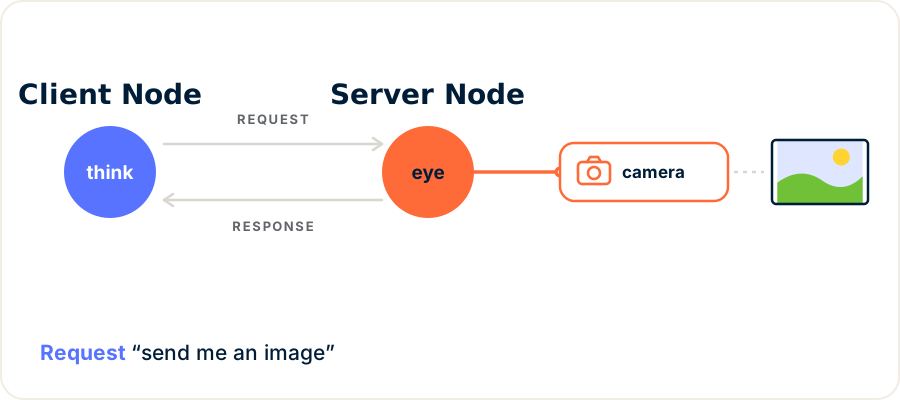
For simpler Actions where there are quick requests and responses, there is a third signal called a "Service". A typical example of that is the camera that a robot has. The thinking Node requests a picture of its environment over the image Service from the eye Node, and the eye Node returns a picture over that Service back to the thinking Node.
This is a basic summary of the core ROS 2 communication concepts. At its heart it's a communication network with Nodes and different types of signals that connect the Nodes, so the whole robot can be controlled from manageable chunks.
Let's try it out yourself
We're going to try to create Nodes and set up the communication lines between the Nodes with the Topics, Services and Actions.
Set up a ROS workspace
We can try this locally on our own machine. The only prerequisite is having Pixi installed, so if you haven't already, please run the following command in a terminal:
# on Unix:
curl -fsSL https://pixi.sh/install.sh | sh

# on Windows:
powershell -ExecutionPolicy Bypass -c "irm -useb https://pixi.sh/install.ps1 | iex"
As soon as you are able to run pixi --version you are ready. If it doesn't work after running the previous command and restarting the terminal, please check out the documentation.
In the ROS world you often work on all of these different Nodes from a workspace. A workspace is nothing more than a separate directory on your machine that contains all the code and configuration that your robot needs. Pixi can help you set up that workspace by running the following commands:
# Create the ROS workspace directory with the required source for the software packages
$ pixi init ros_ws --channel https://prefix.dev/robostack-lyrical
$ cd ros_ws

# Only on macOS:
$ pixi workspace platform rm osx-arm64
$ pixi workspace platform add osx-latest=osx-arm64 --osx 14

# Add the starter ROS 2 package
$ pixi add ros2-desktop

# Activate the just installed workspace to get access to the CLI tools
$ pixi shell
After these commands you're ready to use the ros2 CLI directly, which looks something like this:
(ros_ws) $ ros2
usage: ros2 [-h] [--use-python-default-buffering] Call `ros2 <command> -h` for more detailed usage. ...

ros2 is an extensible command-line tool for ROS 2.

options:
  -h, --help            show this help message and exit
  --use-python-default-buffering
                        Do not force line buffering in stdout and instead use the python default buffering, which might be affected by
                        PYTHONUNBUFFERED/-u and depends on whatever stdout is interactive or not

Commands:
  action     Various action related sub-commands
  bag        Various rosbag related sub-commands
  component  Various component related sub-commands
  daemon     Various daemon related sub-commands
  doctor     Check ROS setup and other potential issues
  interface  Show information about ROS interfaces
  launch     Run a launch file
  lifecycle  Various lifecycle related sub-commands
  multicast  Various multicast related sub-commands
  node       Various node related sub-commands
  param      Various param related sub-commands
  pkg        Various package related sub-commands
  plugin     Various plugin related sub-commands
  run        Run a package specific executable
  security   Various security related sub-commands
  service    Various service related sub-commands
  topic      Various topic related sub-commands
  wtf        Use `wtf` as alias to `doctor`
Using Nodes
Starting Nodes can be done with the ros2 run command. To find Nodes you need to know which Package the Node comes from. Luckily the ros2-desktop package comes with simple demo_nodes_py and demo_nodes_cpp packages that we can use to test some of these concepts. As the names suggest, these two packages are written in different programming languages, Python (py) and C++ (cpp).
To find all packages available in the workspace you can run the following commands:
# Find all packages installed in the environment
(ros_ws) $ ros2 pkg list
action_msgs
action_tutorials_cpp
action_tutorials_py
...
demo_nodes_cpp
demo_nodes_cpp_native
demo_nodes_py
...

# Find all executables of a package with:
(ros_ws) $ ros2 pkg executables demo_nodes_cpp
demo_nodes_cpp add_two_ints_client
demo_nodes_cpp add_two_ints_client_async
demo_nodes_cpp add_two_ints_server
...
Communicating over a Topic
For a Topic we need a Publisher and a Subscriber, sometimes known as talker and listener, or sender and receiver.
To do this we need something that you'll use more often in the ROS ecosystem: multiple terminals at the same time. Each Node is started by a ros2 run command in its own terminal. In this simple example we're going to need 2 terminals in which we're going to run the talker and listener. Make sure you always run in the Pixi environment, so either use pixi run as a prefix for the ros2 run or activate the environment with pixi shell first.
# Terminal 1
$ pixi run ros2 run demo_nodes_cpp talker
[INFO] [talker]: Publishing: 'Hello World: 1'
[INFO] [talker]: Publishing: 'Hello World: 2'
...
# Terminal 2
$ pixi run ros2 run demo_nodes_cpp listener
[INFO] [listener]: I heard: [Hello World: 7]
[INFO] [listener]: I heard: [Hello World: 8]
...
Here you see that there are two processes, Nodes, communicating with each other in quick succession. Congrats, you've set up your first ROS Topic communication.
While this is going on there are some fun introspection tools to understand what is happening. In a complete system these are going to be very helpful to debug issues.
# See which nodes are currently running
ros2 node list

# See which topics are currently publishing something
ros2 topic list

# See what type of message is sent over the /chatter topic
ros2 topic info /chatter

# See the content of the topic without creating a Node that can listen to it
ros2 topic echo /chatter
There are many more of these commands so don't hesitate to investigate the options of the ros2 command.
To continue with something slightly more fun, let's create a turtlesim. This is a very famous example of computer engineering, where you simply control the movement of a turtle on a canvas. We're going to need more terminals again.
Stop the other two terminals with Ctrl+C and run the following:
# Terminal 1: Start the sim, which should pop up a little window.
ros2 run turtlesim turtlesim_node
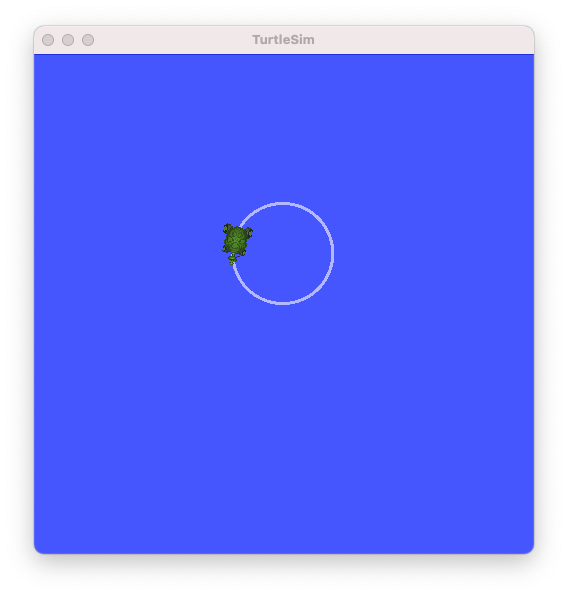
Now control the turtle's movement over the /turtle1/cmd_vel Topic that the simulator is listening to.
# Terminal 2: directly publish to a topic
ros2 topic pub --rate 1 /turtle1/cmd_vel geometry_msgs/msg/Twist "{linear: {x: 2.0}, angular: {z: 1.8}}"
Now the turtle should be moving and you can actually see its movement in the visualizer or by listening to the simulator's pose output Topic:
ros2 topic echo /turtle1/pose
Communicating over Services
Let's now look into how we can send a request and only expect one response. A Service is set up between two Nodes that send a question or instruction and expect one result back. In the case of the turtlesim we can look at two examples.
Spawning another turtle in the simulator can be done over the /spawn Service, with the Spawn message. Make sure you keep the turtlesim in terminal 1 running and stop the Topic publisher in terminal 2 with Ctrl+C. Then run the following command:
# Terminal 2:
ros2 service call /spawn turtlesim_msgs/srv/Spawn "{x: 2.0, y: 2.0, theta: 0.0, name: 'turtle2'}"
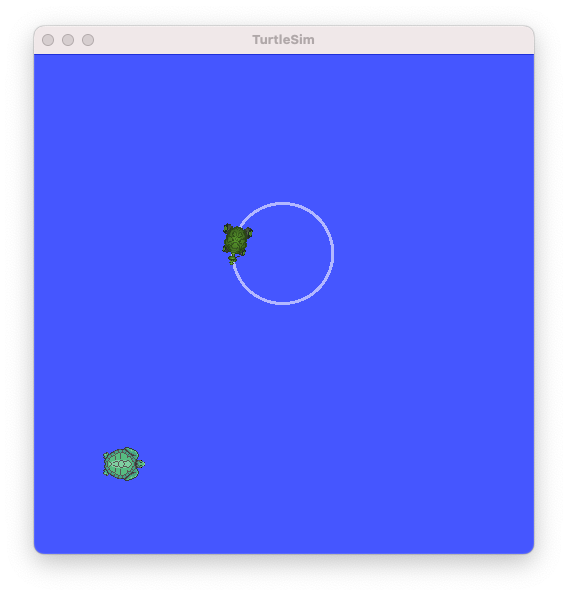
Now you should see a second turtle added to the sim. To clean up the simulator we can use another Service that doesn't need any input, so it's more similar to a button push.
# Terminal 2:
ros2 service call /clear std_srvs/srv/Empty
After running this we've cleared up the simulator.
Communicating over Actions
Now we've seen both the continuous communication with Topics and the spontaneous communication over Services. We need one more type of communication for long-running request and response type functions. Actions can be used for this.
The turtlesim again helps us try this communication style. It has the ability to rotate the turtle a certain amount of radians and give feedback while the move is being made. This is done over the /turtle1/rotate_absolute Action and you can check its interface with the following commands:
# Terminal 2:

# See available actions of the running nodes
$ ros2 action list -t
/turtle1/rotate_absolute [turtlesim_msgs/action/RotateAbsolute]
/turtle2/rotate_absolute [turtlesim_msgs/action/RotateAbsolute]

# Show the content of the action message type
$ ros2 interface show turtlesim_msgs/action/RotateAbsolute
# The desired heading in radians
float32 theta
---
# The angular displacement in radians to the starting position
float32 delta
---
# The remaining rotation in radians
float32 remaining
Now let's send a full rotate message to one of the robots:
# Terminal 2:
ros2 action send_goal /turtle1/rotate_absolute turtlesim_msgs/action/RotateAbsolute "{theta: 1.57}" --feedback
This should have given you a lot of feedback about the remaining angle, and when the turtle is finished moving you see the SUCCEEDED status message.
You can see a more relevant example by starting the turtle_teleop_key Node. This mixes a Topic for /cmd_vel and a set of Actions for the /rotate_absolute Action.
Start the teleoperation control Node with:
# Terminal 2:
$ ros2 run turtlesim turtle_teleop_key
Reading from keyboard
---------------------------
Use arrow keys to move the turtle.
Use g|b|v|c|d|e|r|t keys to rotate to absolute orientations. 'f' to cancel a rotation.
'q' to quit.
While that is running you can check the Node's interface with the following command:
# Terminal 3:
$ pixi run ros2 node info /teleop_turtle
/teleop_turtle
  Subscribers:

  Publishers:
    /parameter_events: rcl_interfaces/msg/ParameterEvent
    /rosout: rcl_interfaces/msg/Log
    /turtle1/cmd_vel: geometry_msgs/msg/Twist
  Service Servers:
    /teleop_turtle/describe_parameters: rcl_interfaces/srv/DescribeParameters
    /teleop_turtle/get_parameter_types: rcl_interfaces/srv/GetParameterTypes
    /teleop_turtle/get_parameters: rcl_interfaces/srv/GetParameters
    /teleop_turtle/get_type_description: type_description_interfaces/srv/GetTypeDescription
    /teleop_turtle/list_parameters: rcl_interfaces/srv/ListParameters
    /teleop_turtle/set_parameters: rcl_interfaces/srv/SetParameters
    /teleop_turtle/set_parameters_atomically: rcl_interfaces/srv/SetParametersAtomically
  Service Clients:

  Action Servers:

  Action Clients:
    /turtle1/rotate_absolute: turtlesim_msgs/action/RotateAbsolute
I hope this helped you learn something about the ROS 2 communication stack and that you were able to try the examples for yourself!
If you want to learn more about using Pixi for robotics, here are some useful links:
Using
package.xmlas configuration files with Pixi-buildInitialize existing workspaces with
pixi-rosAdd more ROS packages to the Pixi ecosystem on RoboStack
Happy robotics development in your future projects!